Showing posts with label Food. Show all posts

Monday, October 8, 2012

A Cupcake Sandwich

A friend showed me this fun little trick on how to eat a cupcake and I eat all my cupcakes this way now...

 
Unwrap and break in half separating the top from the bottom.

 
Flip the bottom to the top and squish down.

 
Eat and enjoy... without the mess.


YUMMMM!

Wednesday, October 3, 2012

Kid Sized Apple Juice


Over the summer, my kids were constantly asking me for Juice.  I like to buy the Apple Juice in bulk since we go through so much of it. The only problem with that is the bottles are just so big and bulky and the kids can't get it themselves or we might have another problem on our hands {and floor!}.

So, after a conversation with my mom, she gave me a great idea. I started saving some smaller plastic bottles and made them their own kid sized Apple Juice containers.  Brilliant! I can still save money by buying in bulk and not having all the waste from the individual drink boxes PLUS my kids can stop asking me every 5 minutes for juice learn how to be a little more independent.

It's super simple and the kids love it!

All you need is a small container that is easy for kids to handle. I used plastic apple sauce containers.


Next, just fill up the small container with Juice from the larger bulky container.


Put them in the fridge and the kids can now easily access the juice with no mess!  WIN WIN!
If the small container gets low, just fill it back up with the larger one.


Saturday, April 7, 2012

Oreo Truffle Eggs


I learned this yummy recipe from my SIL and thought I would make some Egg shaped oreo truffles for the kids teachers for their Easter Gifts.  They are sooo good, it is very difficult to refrain from eating any while you are making them.

What you need:
1 Package of Oreo Cookies
1 8 oz package of Philadelphia Cream Cheese
Bamboo Skewers or other kind of stick with a pointy end.
1 bag of Candy Melts in your choice of color
wax paper

What to do:
With a blender (I used my Kitchenaid), dump all the oreos and package of cream cheese into the bowl and beat, mix and blend until somewhat smooth.


Using a cookie scoop or spoon, scoop out balls of oreo mix onto wax paper lined pan. Be sure the pan you select will fit nicely into your freezer. Put the pan into the freezer for 2 hours.


Shape the frozen balls into egg shapes using a plastic bag. I used a gallon size ziplock bag so I could put my hand into the bag and form the egg shape without making a huge sticky mess.


Melt the Candy Melts following the directions on the package and put a stick in the bottom of the egg oreo and dip until completely covered.


Let the candy melts dry (hold them in the freezer for a few minutes) before laying them back down on the wax paper. Remove the stick. You can then re-dip the bottom to cover the hole.

You can "decorate" your eggs with different colored candy melts if you wish.


Cut an egg carton in half or leave hole for a larger gift. Using the small cupcake liners, line the inside of each of the egg holders.

Place your candy covered oreo truffles into the egg liners and tie the egg package with a bow.


 Enjoy and have a wonderful Easter!!!

Friday, April 6, 2012

THANK YOU!!!


This morning I received this yummy Cheryl's package from my book publisher, C&T Publishing / Stash Books.  The boxes were filled with Chocolate Chip, Oatmeal Raisin, Chocolate covered Pretzel Clusters, and Buttercream Cut-out Cookies... YUM!


It was my birthday this past Tuesday... 32 -  WOO HOO! I am loving my 30s. I am not sure why some people hate turning 30... I was actually looking forward to my 30s.


The kids even enjoyed their pick of cookie.


THANK YOU C&T!  We all love my birthday cookie package! 

Thursday, November 24, 2011

A Thanksgiving Day Recipe

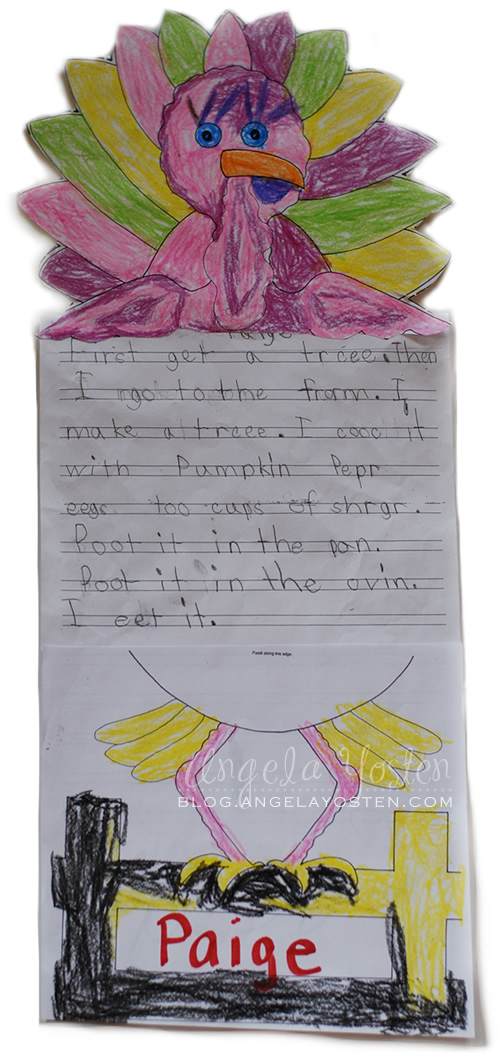
It's Thanksgiving Day and I want to say Thanks to all of my readers that visit my blog.  I really appreciate all the wonderful comments and support I have received through my blog and have made many new friends that I cherish always.

To share in the Thanksgiving, my daughter wanted to share her delicious and fool proof recipes that she came up with at school.  ENJOY!

 Translation... First get a turkey. Then I go to the farm. I make a turkey. I cook it with pumpkin, pepper, eggs, 2 cups of sugar. Put it in the pan. Put it in the oven. I eat it.
Translation... Paige's pumpkin pie

1 cup of frosting
1 cup of vanilla
1 cup of pumpkin
2 eggs
2 spoons of salt
2 spoons of sugar
3 cups of chocolate
4 teaspoons of flour

mix it together, put it in the oven, bake it at 2 degrees for 3 hours. Eat it.


{LOVE HER!}

Have a wonderful Thanksgiving Day!

Wednesday, February 2, 2011

Happy Birthday Cake

Today we have been iced and snowed in, but most of all, it is my hubby's birthday!  So, what is a birthday celebration without a Chocolate Birthday Cake?  His favorite is Chocolate cake. Here is the cake we made today and it is SOOOO Delicious!  Lots of layers and lots of chocolate!


To get started you will need:
1 Box of Betty Crocker's Devil's Food Cake
plus the ingredients listed on box to make the cake.

Icing:
3 cups Powdered Sugar

2/3 cup Nestle Toll House Baking Cocoa
1 stick of butter
5-6 Tbsp. Milk
1 tsp. Vanilla Extract

Garnishes:
Dark Chocolate bark or candy melts
Semi-sweet Chocolate Chips

Special Tools by Pampered Chef
Torte Pan Set
Microplane Adjustable Grater


Instructions:

Make the cake as directed on the box.  I used The Pampered Chef Torte Pan Set and split the batter into two pans. Bake and Cool.


Icing... follow the instructions provided on the back of the Nestle Toll House Cocoa box for the Chocolate Icing.


Carefully remove one of the cakes from the torte pan and place on a cake plate.


Pour part of the chocolate icing into the indent area of the cake.


Using The Pampered Chef Microplane Adjustable Grater, grate a nice layer of the dark chocolate bark or candy melts on top of the icing. 


Carefully remove the second cake from the torte pan and place on top of the other cake.


Pour the remaining chocolate icing in the center of the top layer of the cake. Depending on the amount of chocolate icing you have left, your icing may run over the sides of the cake which is fine. 


Grate more of the dark chocolate over the top layer of the cake.


Add some chocolate chips to finish it off.


Eat and enjoy!  Oh...  and don't forget the Milk!

Happy Birthday, Richie!!!

Monday, December 21, 2009

Island Cookies


These cookies were made by another new friend of mine, Misty.  She has two almost teenage girls and is super sweet!  Thank you, Misty, for baking up these wonderful cookies and sharing your recipe.

INGREDIENTS:
1 2/3 cups All Purpose Flour
3/4 teaspoon Baking Powder
1/2 teaspoon Baking Soda
1/2 teaspoon Salt
3/4 cup (1 1/2 sticks) Butter, softened
3/4 cup packed Brown Sugar
1/3 cup Granulated Sugar
1 teaspoon Vanilla Extract
1 large Egg
1 3/4 cups Milk Chocolate Morsels
1 cup Flaked Coconut
1 cup Choppped Pecans
3/4 cup Cranberries (optional)

INSTRUCTIONS:
Preheat oven to 375 degrees
Mix all dry ingredents together first.  Then mix in wet ingredients. Add in morsels, coconut, pecans, and cranberries.  Mix well. Drop tablespoon size dough onto an ungreased cookie sheet.  Bake at  375 degrees for 8-11 minutes.

Friday, December 18, 2009

Carletta's Creamy Apple Cookies


These cookies were created by a new friend of mine, Carletta.  She is such a sweetheart and has the most adorable little girl.   I have recently tried a couple more of her recipes and am now trying to convince her to start a blog of her own.  AWESOME COOK/BAKER! Thank you Carletta for sharing your recipe with me to post on my blog and I hope you don't mind me posting your intro... 

"Hello Cookie Lovers!!!! Here is the recipe for Carletta's Creamy Apple Cookies. Now so you all know my kitchen was a mess trying to come up with this, I started trying to make the dough and everything from scratch (so old school). Then I realized that a long time ago someone did all this work for me and came up with canned goods and ready to bake dough's, it doesn't make us any less of a Baker right?!?!?! LOL Enjoy my creation & Happy Holidays!!!


INGREDIENTS:
6 Pepperidge Farms Pastry Sheets (I suppose any brand would work just don’t purchase the ones that are in many layers-too much work!!) (Puff Pastry sheets)
1 21oz can of Apple Pie Filling
2 8oz Philadelphia Cream Cheese
2 cups of Confectioners’ Sugar (Powdered Sugar)
1 1/2 Tbs Cinnamon
1 cup of All purpose Flour (for sprinkling on cooking surface. Not for filling.)


INSTRUCTIONS:
Make sure you follow the thawing directions on the pastry sheets!!!!
PreHeat oven to 400

In a large mixing bowl mix the Apple Pie Filling, cream cheese, conf. sugar and Cinnamon. (A small hand held elec. mixer is fine)

Mix until the apples are no longer large chunks. Set aside.

Sprinkle a fine layer of flour on your cooking surface to lay out the pastry sheets.

Lay out the pastry sheets.

Use a cookie cutter (circle) or a glass. Cover the ring of the glass or cookie cutter in flour.

cut out as many circles as possible-Do not be afraid to get them too close together-the goal is to not have too much pastry sheet left over

Place your circles on a ungreased baking sheet 1-2inchs from each other.

If you have any left over dough just ball it up sprinkle a little more flour on your prep surface and roll it back out to get in a few more cookies-Only repeat this 2 times because the dough will become hard from the flour on your prep surface.

After all your cookies are cut out and placed on baking sheets use your fingers and pinch the sides in on the cookies to form a bowl-like Tostitos scoops!?!

Use a teaspoon and fill each cookie with the filling you mixed earlier.

For decor I sprinkled a little cinnamon on the top.

Place in the oven for 15-20 min

The filling will puff up while in the oven but when you bring it out to cool it will flatten back out to make it look more like a cookie.

YIELD: about 4 dozen

Wednesday, December 16, 2009

Chocolate Mint Truffles


This recipe is what I made for the cookie exchange.  It was so quick and easy...I actually made mine very last minute.  This recipe originated from a Nestle cookbook.  I made mine with the Baking Cocoa for the coating and I actually suggest you don't use the cocoa unless you like the taste of straight baking cocoa.  I would suggest that you use Powdered Sugar or Chopped nuts for the coating of the truffles.

INGREDIENTS:
1 3/4 cups (11.5 oz package) Milk Chocolate Morsels
1 cup (6 oz) Semi-Sweet Chocolate Morsels
3/4 cup Heavy Whipping Cream
1 Tablespoon Peppermint Extract
1 1/2 cups Baking Cocoa or Chopped Walnuts or Powdered Sugar

INSTRUCTIONS:
Line baking sheet with wax paper.  Place milk chocolate and semi-sweet chocolate morsels in large bowl.  Heat cream to a gentle boil in small saucepan; pour over morsels.  Let stand for 1 minute; stir until smooth.  Stir in peppermint extract. Cover with plastic wrap; refrigerate for 35 to 45 minutes or until slightly thickened.  Stir just until color lightens slightly.  (Do not overmix or truffles will be grainy) Drop by rounded teaspoon onto prepared baking sheet; refrigerate for 10-15 minutes. Shape into balls; roll in nuts, cocoa, or powdered sugar.  Store in airtight container in refrigerator.

YIELD: makes about 48 truffles.

Tuesday, December 15, 2009

Pecan Chocolate Chip Cookies


This Chocolate Chip Cookie recipe is D-E-L-I-C-I-O-U-S!
Thank you Amy Tyler for allowing me to share your recipe on my blog.  Amy is a very good friend of mine and a wonderful mother.  She just started sewing about a year ago {her hubby bought her her first sewing machine for Christmas last year} and is having a blast.  Amy has two little ones about the same ages as my kids and they love playing with each other.  Amy... Thank you for being such a cherished friend!

Okay... on to the Recipe....

INGREDIENTS:
1 cup (2 sticks) Butter, softened
3/4 cup Granulated Sugar
3/4 cup packed Light Brown Sugar
1 Tablespoon Vanilla Extract
2 Eggs
2 1/4 cup All Purpose Flour
1  teaspoon Baking Soda
1/2 teaspoon Salt
2 cups Hershey's Milk Chocolate Chips
1 cup chopped Nuts (pecans)
1 (4 oz) package Instant Vanilla Pudding Mix


INSTRUCTIONS:
1. Heat oven to 375 degrees.

2. Blend butter, sugar, brown sugar and vanilla in a large bowl.  Mix until creamy.  Add eggs and beat well.  Stir in gradually flour, baking soda and salt.  Stir in vanilla pudding mix.  Blend together well.  Add chocolate chips and pecans.

3. Drop teaspoon of mix onto ungreased cookie sheet. 

BAKE 12-13 minutes or until edges are slightly brown


YIELD:
A little over  3 1/2 dozen cookies.

Monday, December 14, 2009

A Cookie Exchange... Kate Spain style.

A very good friend of mine and I hosted a cookie exchange yesterday afternoon and it was delicious!


We used plates and napkins from Target designed by the very talented Kate Spain.


A cookie exchange kit from Target. {LOVE this store!}


And we had the MOST DELICIOUS cookies EVER! 

Cream Cheese Apple Cookies {I have to say these were my absolute favorite cookies. I go for pretty much anything with apples... YUMMM!}


Island Cookies... another delicious cookie


Pecan Chocolate Chip Cookies... my husbands favorite!  {Thanks Amy! ;)}


Chocolate Mint Truffles... mmmm.


Not to mention the yummy chocolates that hung about.


For their Christmas gift/party favor... a decorated travel mug that we all used for our Hot Chocolates and Coffee during the party.


Thank you so much girls for coming!  I had a wonderful, relaxing time sharing cookies with you all.  It was just what I needed in this stressful time of year. :)

Check back this week for the recipes to the wonderful cookies shared by my friends.

Friday, December 11, 2009

Christmas Tree Cinnamon Rolls


My mom came up with this idea and shared it with me.  It was such an ingenious idea, that I just had to share it with all of you!  I hope you like it!

Ingredients... one can of Pillsbury Grands! Cinnamon Rolls


Instructions:

Step 1... Pop open the package and place the cinnamon rolls on a baking sheet.

Step 2... Using a sharp knife, cut each roll into fourths.

Step 3... Split the now cut rolls apart and space evenly on your cookie sheet. 

Step 4... Using the specified baking time listed on the package, BAKE.  Because they are much smaller rolls now than originally packaged, the baking time is now cut in half.  For example, if the package says to Bake for 30 minutes, only bake for 15 minutes.  Each oven is going to cook differently so be sure to adjust as neccessary.

Step 5... Remove rolls from oven and apply frosting.  You may need to gently push the little tree rolls back together before frosting.

For a little more sparkle, sprinkle with little green crystal sprinkles to give your trees some color.

An Easy and Perfect treat for Christmas Breakfast... enjoy!
Related Posts with Thumbnails