
This is great to use on blogs that do not allow you to upload your own custom favicon. What is a favicon? A favicon is the little tiny icon that sits just to the left of the http://... in your address bar of your web browser. This favicon can be customized to brand your blog or website.
Using a photo editor such as Adobe Photoshop or Adobe Fireworks, create an image you would like to use as your favicon. TIP: The image resolution should be 72 pixels/inch. The image size should be 32 x 32 pixels square. Save your favicon as a GIF, PNG, JPG, BMP, ICO, or TIFF and must be less then 1MB in file size.

Step Two:
Go to http://www.iconj.com/favicon_hosting.php. Under the title Free Favicon Hosting, click on the Browse button and select the saved favicon image. Just leave the Sharpen Level to No Sharpen. Click the Upload It! button.
Step Three:
Now with your Favicon.ico successfully generated, you are given two options.
A: You can do a Direct Download of your favicon and save the .ico file to your web server if you are allowed to. Simply follow the instructions they provide to add your .ico image to your website/blog.
B: You can have IconJ.com host your .ico image and link to it from your website/blog by inserting the html they provide into your code.

Option B is generally used by the non-web developer that wants to add a more custom look to their blog. The following steps will show you option B and how to install it into your blog code.
Step Four:
Copy and Paste the code under the title Host It at IconJ.com (Direct Link)
Step Five:
In Blogger, you will need to login to your blogger account, click on the Design tab/link, then click on Edit HTML.

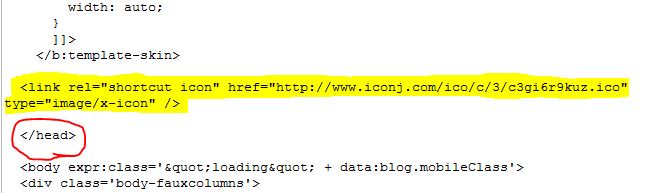
Step Six:
Just before the ending head tag paste the code you just copied from IconJ.com. It should look something like this...
Click Save Template.
CONGRATULATIONS!
You can now view your blog and see your new custom favicon displayed in the address bar and the window tab.
What's your FavIcon?
Thank you so much! I've been wondering about that for months now and didn't even know what it was called to research how to change it - you just solved that and then some.
ReplyDeleteVery cool Angela! I actually already have my own favicon (which I did in a similar way to your tutorial) based on my old blog background but I've been thinking I need to change it.
ReplyDeleteThank you Angela! I now have a favicon... :)
ReplyDeleteThank you so much! I now have a favicon too!! I've been wondering how to figure this out too! :)
ReplyDelete*WHO'S* my favorite??? **YOU'RE** my favorite!!
ReplyDeleteI've always wondered how to do this.
I'm now one step closer to cool.
Yes! More web tips! Thanks!
ReplyDeleteThank you so much Angela! I now have my loon favicon for Mary on Lake Pulaski! Sweet!
ReplyDeleteI just now got brave enough to do this and your tutorial was so easy. Thanks...now I have a linus holding a blankie favicon!
ReplyDeleteCool. I may try this tomorrow to see if I can do it and to add it to my blog. Thanks for the tip. :) I had always wondered how those things are made. I also didn't know the name it was called. I guess I learn something new everyday.
ReplyDeleteThank you Angela. Your tutorial will come in very handy and I hope it's not the last I see. I'm an IT illiterate and only started blogging this week. I suspect my blog is full of information that says nothing and I'm so intimidated by all the information that's given by the help or learn more functions. So I shall diligently keep track of this post.
ReplyDeleteOMG that's so cool! I saw your blog on blogs of note, and one of the first things I thought was "how did she get that butterfly up there?" Thanks so much for providing the answer!
ReplyDeletewow - thanks, I'll be doing this as soon as I get home. Awesomeness!
ReplyDeleteIt is very helpful, worth a try
ReplyDeleteThank you so much! Now I have favicon for my blog: http://www.kimiaisfun.co.cc/
ReplyDeletemore tip please!